Does Tattoo Numbing Cream Work?
Posted by BRANDON WALLACE

All it takes is a quick Google search to find people looking for pain-free tattoos. While it's hard to understand for most artists, there are people out there that don't think the discomfort of being tattooed is a good thing. It would be great if you could just buy any product, throw a sign up in the shop window that said, "Pain Free Tattoos Here!" and go, but what makes a good numbing cream and do they work at all?
Why Don't Tattoo Artists Use Numbing Cream?
A lot of tattoo artists refuse to use numbing creams or sprays during their sessions. There's a few reasons, but most of them boil down to two:
1. They consider the pain of a tattoo part of the tradition and a rite of passage.
2. They've used numbing cream before and it didn't work.
There's a huge part of the tattooed community that considers the pain part of the process of getting their ink. People this group tend to look at any irritation or pain they feel as just another part of their tattoo that makes it more meaningful. If you're in this category it's worth understanding that you will eventually get a client that has an ultra-low pain tolerance. It will happen. For these clients, the pain isn't tolerable - but that doesn't make their tattoo any less important to them.
If you're in the second group, it's entirely possible that the numbing cream you used wasn't great - but that doesn't mean that all numbing creams and sprays are ineffective. Keep reading to get an overview of how numbing cream works and how you can make it work for you.
How Does Numbing Cream Work?
How numbing cream works depends on which active ingredient is in the mix. Most tattoo numbing ingredients fall into three categories:
Nerve Deadeners
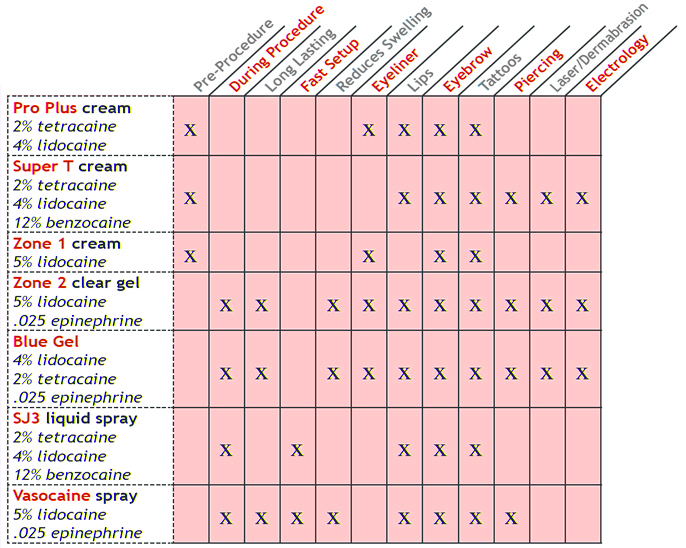
Chemicals like lidocaine temporarily deaden the nerves in the skin to prevent those nerves from registering pain. Nerve deadeners are great, but they rarely sink below the surface of the skin, which means they aren't going to be 100% effective for tattoos. Nerve deadening mixtures include Zone 1 cream, which is 5% lidocaine. In order to get the most out of these, they'll need to be combined with a nerve blocker or vasoconstrictor.
Nerve Blockers
Nerve blockers include tetracaine. These chemicals mean your nerves still register some level of pain, but they don't send the, "OW!" signal to the brain. Tetracaine and it's fellow nerve-blocker, benzocaine, are both pH-neutral, like most nerve blockers. Because they don't prevent the nerves from registering pain on their own, nerve blockers are usually combined with nerve deadeners to prevent involuntary flinching. Pro Plus cream (Dermal Source) is an example of a lidocaine/tetracaine (nerve deadener/nerve blocker) mix; creams like these are most commonly used for numbing during permanent eyeliner application.

Vasoconstrictors
Vasoconstrictors are the most powerful numbing agent you'll be able to use. Vasoconstrictors include epinephrine, and they work by causing blood vessels to constrict which reduces bleeding. These chemicals also slow down absorption, which means that, when mixed with other numbing agents, they allow them to last longer. Epinephrine mixes are also great for use during tattoo sessions because they cut down on bleeding and swelling. Because they act quickly, reduce bleeding and can be safely used during the session, mixed numbing sprays like Vasocaine (lidocaine and epinephrine) and Blue Gel (lidocaine, tetracaine, and epinephrine) are some of the most effective on the market.
How To Use Tattoo Numbing Cream
When it comes to using numbing cream in your shop it can take a little bit of trial-and-error to get the process completely right. Here are the best steps you can follow to keep your sessions pain-free:
1. Pick the right set-up; not every numbing cream is right for every tattoo.
If a client comes in with a random numbing cream off the shelf they're going to need to reschedule; the right numbing cream makes a huge difference in how long it lasts and if it can be applied during their session. If they bring in a cream without epinephrine, it's going to wear off halfway through their tattoo and they're going to get a very unpleasant surprise. Check our selection-chart (to the right) and make sure you're working with the right tools.
2. Wash the client's skin with green soap or a numbing wash (like Super Juice 3).
You'll want to remove dead skin and oil before you apply your numbing solution. Green soap will work just fine, but numbing washes (like SJ3) increase the numbing effect of other topicals by keeping the skin pH neutral. Green soap as a small amount of alcohol in it, which can make skin more acidic and slow down or stop some creams and sprays.
3. Apply the pre-deadener... and wait.
Ideally, a client can do steps 2 and 3 at home, because after you've applied your pre-deadener you'll need to wait 5-30 minutes for the area to numb. The amount of time depends on the numbing cream you're using and the area it's applied to: thicker skin takes longer to numb than thin skin.
4. Wash off your pre-deadener and start the tattoo.
Once the area is numb, you'll wash off the pre-deadener and start the tattoo. It doesn't need to be on the skin in order to keep working, and some numbing creams that are safe topically can cause irritation to broken skin.
5. Apply an approved spray every 15-20 minutes during the session.
Preferably a vasoconstrictor, your broken-skin approved spray will keep the client numb throughout the session. If you're using a spray you can transfer it to a small spray bottle with a nozzle to make it easier to bag.